Start with a new Type Layer, type-face Arial, Bold Italic, and in this case its better to work with a larger Font size — (Document size is 640×480, so i used a font size of 550 pt (anti-alias method to – Crisp).

-
Click Layer C and drag it to the New Layer icon located at the bottom of the Layers Palette. (This will produce Layer C copy)
Click the ‘Eye’ Layer visibility icon for Layer C to toogle it to hidden as caputred below..I also added a dark background for sharp contrast.
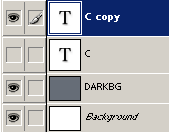
- Next click ‘C copy’ layer to activate it, then Right Click/Control Click on the layer and choose ‘Rasterize Layer’ from the contxtual list.
Note: Rasterize the text layer will no longer be edit able
-
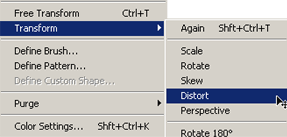
With the rasterized ‘C copy’ Layer still selected, go to the ‘Edit/Transform/ Distort’ menu command or press Ctrl + T.
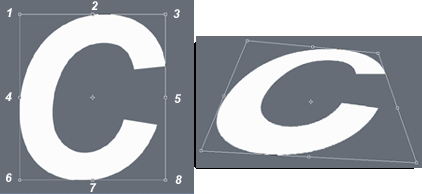
Now you can see the eight points on the bounding box of the layer. With patience/practice, start dragging from the corners to get it as close to mine as possible, or to the angle you prefer to work with. In any case try to achieve an angle away from the 2d point of view.
-
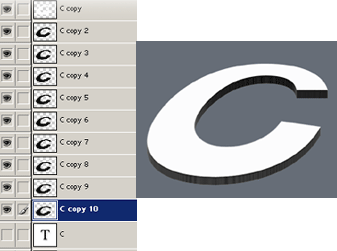
Now duplicate (Right click on C copy > Duplicate) the ‘C copy’ layer, and drag it below the main C copy layer, like i have below. (Now i have ‘C copy 2’ layer)
Set this Layer content color to Black. -
Then use the ‘Down Arrow Key’ to nudge that layer twice downward. You’ll see the makings of a shadow take place. But we’re not going to use it as a shadow, but as the start of the actual 3d shape of the letter.

-
Now repeat the process of duplicate the layer, drag it down below the previous, then nudge twice with the ‘Down Arrow’ key. Do so until you get the layers palette and the outcome result looking close to mine.
-
‘Stamp Layers’
The next process is known as Stamping (or merging) layers.Select the first shadow layer (‘C copy 2’ – as in figure 7), then press the ‘Ctrl + e’ keys.
This will merge ‘C copy 3’ into ‘C copy 2’.Then select ‘C copy 3’ Layer, press ‘Ctrl + E’ to merge into ‘C copy 4’ and repeat process for the subsequent Layers until you are back to a single merged ‘C copy 10’ layer like I have captured below.
Alternatively:
Click ‘C copy 2’ Layer (as in figure 7)
Then Shift + click ‘C copy 10’ Layer.
Then pres Ctrl + E to merge all selected layers into a single Layer.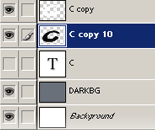
-
Now we’re going to work with the main ‘C copy’ layer for color/lighting. Duplicate that layer for backup and turn visibility off.
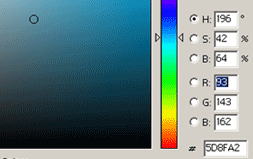
Double click the Foreground Color swatch on the Toolbar and from the Color Picker dialog set the color to #5D8FA2 (as captured below), or to the color of your choice.
We’re going to use this color as the base of the ‘Copy C’ layer.
-
Now go to Layer(Menu Option) New Fill Layer, Gradient.
Now you should see this option, check the ‘Group With Previous Later’ option, then OK.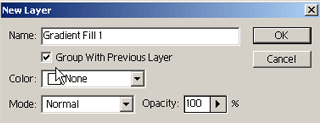
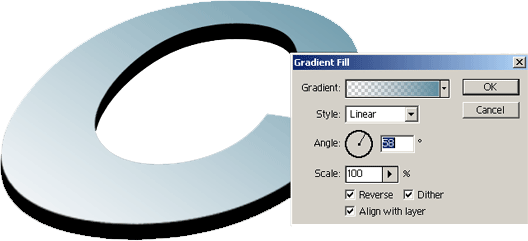
Now you should get this box for your ‘Gradient Fill’ options, tick the ‘Reverse/ Dither’ options and pick the angle of your choice and hit ‘Ok’. As you can see the 3d effect is coming through now.
-
Duplicate ‘C Copy 3’ to get ‘C Copy 4’ layer, drag it below the ‘C Copy 3’ layer, and hide ‘Copy 3’ layer. Then set your foreground color to ‘#42BBEA’. Next, ‘Control + Click’ ‘C Copy 4’ layer to select it, go ‘Edit/Fill’ : Choose the foreground color. (picture on the right)

-
Next, go to Filter (Menu Option), Render, then ‘Lighting Effects’ and try to match what i have below.
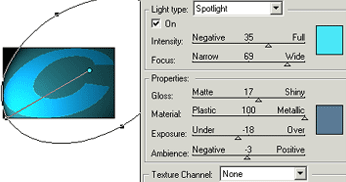
Next, repeat the same process on the C copy 10 layer:(Menu Option), Render, then Lighting Effects and try to match what i have below.
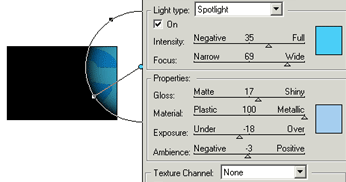
-
Next, apply the following two ‘Blending Styles’ to the same ‘C Copy 10’ layer.
Bevel and Emboss: Highlight Color #0C78B8 / Shadow Color #000000. Gradient Overlay: Start Color #011C27 / Gradient End Color #0C75B5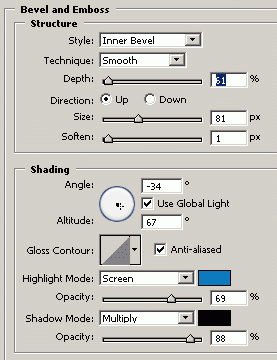
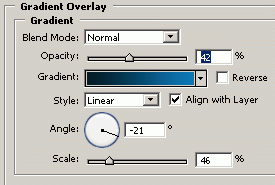
Here’s the final result.

