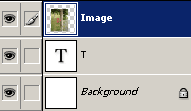
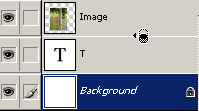
As captured, center, hold the Alt key (Mac: Option key) and place your cursor at the dividing area between the two layers until you see the ‘Clipping Mask’ cursor appear ![]() . While that cursor is visible, click once …
. While that cursor is visible, click once …
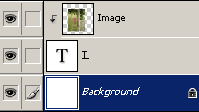
As captured, right, and you should see the upper layer indent and marked with a downward arrowhead (the ‘Clipping Mask’ icon). As well, the target layer also indicates a Clipping Mask is attached, as the layer title is now underlined.
Here’s the quick end result.
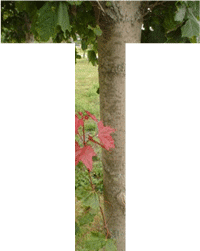
Alternatively:
1.) Ctrl + G (Mac: Command + G) key combination on the upper layer.
2.) Link the layers you want to create a clipping group, and choose ‘Layer/Create Clipping Mask from Linked’.
To release the ‘Clipping Mask’:
1.) Shift + Ctrl + G (Mac: Shift + Command + G) on either layer within the group.
2.) Repeat the above original step of Alt + click (Mac: Option key + click) on the dividing area between the two Layers.
3.) Link the layers you want to create a clipping group, and choose ‘Layer/Release Clipping Mask’.
Note:
Use the ‘Move Tool (V)’ ![]() on the image layer (like in the above example) and notice how it moves without it affecting the mask.
on the image layer (like in the above example) and notice how it moves without it affecting the mask.
Turning visibility off to the base Clipping Layer (the one thats marked with an underline in the title name), also hides the layers that are grouped with it.
Paste Into
Another method of having an image appear inside a text/type layer, requires these short steps.
Copy an image into the Clipboard that you want to use. Ctrl + click (Mac: Command + click) on the type thumbnail ![]() in the Layers Palette to reveal a transparent selection. (As I have captured below, indicated by the Marquee))
in the Layers Palette to reveal a transparent selection. (As I have captured below, indicated by the Marquee))

Next, go to ‘Edit/Paste Into’, and the image will be placed into a Layer Masked version of the type layer. (As I have captured below).
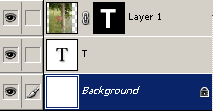
Thus, producing the same end result as the above ‘Clipping Mask’ technique.

Apply Filters
Ever try to apply a filter to a Type Layer, only to be greeted by the below message.

Unless you choose ‘Ok, then pretty much all the filters are available, but the Type Layer is no longer edit able.
To retain Type Layer edit ability and to apply filters simply apply a ‘Layer Mask’ to the Type Layer with the below simple steps.
Ctrl + click (Mac: Command + click) on the type thumbnail ![]() in the Layers Palette to reveal a transparent selection. (As captured below)
in the Layers Palette to reveal a transparent selection. (As captured below)

Then once the selection is made, simply click the ‘Make Layer Mask’ icon ![]() on the bottom of the Layers Palette.
on the bottom of the Layers Palette.
You should then see the ‘Layer Mask’ thumbnail in the Layers Palette as I have captured below.

To apply a filter, Select that ‘Layer Mask Thumbnail’ first (Not the ‘Layer Thumbnail’) and then choose a filter from the ‘Filter’ menu option.
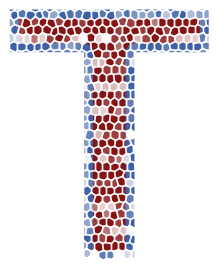
In my example below, I combined (Photoshop CS) a ‘Texture/Patchwork’ & ‘Texture/Stainglass’ filters with the Filter Gallery to achieve the below example.
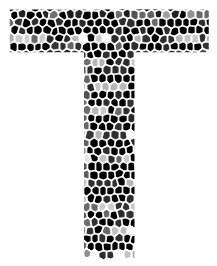
Important Note: Masks are greyscale composites of the original layer, & if your original type layer is Black (as is my above sample), then to achieve variations or enhenced manipulations with color through the above described technique will require additional layers, Grouped Layers, Adjustment Layers or applied Blending Styles.
So, just to add color to this I went and applied some Blending Styles. Before you do, also make note of the ‘Layers Mask Hides Affects’ option is ticked on the main Blending Styles control panel.
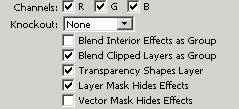
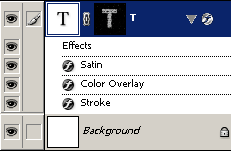
And just a preview ofthe Layers Palette without getting into detail of the Blending Stlyes….
… and here is the final ‘Filter’ affect, combined with Blending Styles for coloration.
This may not a big revealation to some, but it certainly opens doors for creative type effects that allows the use of filters.
Click and type your text onto your document at the insertion point, then ‘Ctrl + Enter’ (Mac: Command + Return) to commit the type layer.
Select the Type Layer in the ‘Layers Palette’.
Then up on the ‘Options Bar’ click inside the ‘Font’ name area
Then simply, use the Up Arrow
Fake Text:
For Font Set Family Types that do not offer the Bold or Italic features, the Character Palette offers these two options to easily fake it.
Open the Character Palette, ‘Window/Character’, or press the Toggle icon on the Options Bar to bring it to the foreground.
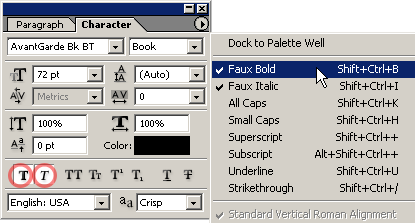
Then click the Palette menu icon to reveal the ‘Faux’ options, as I have captured below. Or select the first two Character Options at the lower area, as I have encircled in red.
