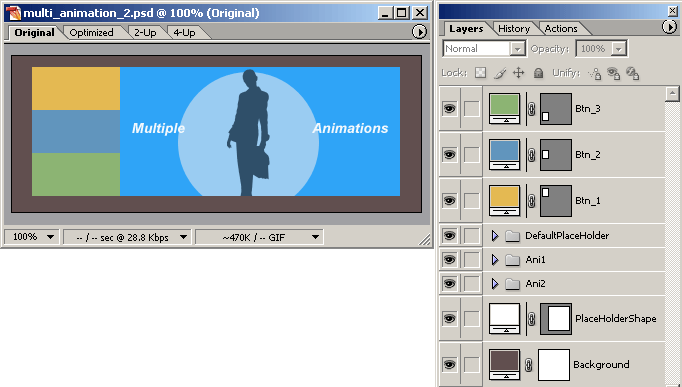
As you probably realize ImageReady only allows for a single active animation.
However, there is a method to utilize multiple animations within a single document through the use of Remote Rollovers.
Note: Remote Rollovers is a feature for CS & CS2 users.
This tutorial assumes you have basic knowledge of animations and remote rollovers.
The below example just such an example.
Mouseover the first two colored buttons to view.
To begin download the base file for this tutorial.
I have laid out all the elements for this tutorial, and I will demonstrate the often over looked feature ofadding animations to rollovers.
Once downloaded, unzip and open in ImageReady.
Examine the file and become familiar with some of the common aspects that I used, primarily Layer Sets and Clipping Groups. Also all the layers I employed are vector layers. This actually helps in creating smaller file sizes as opposed to using pixel and or layer masked elements.
Let’s cut to the chase.
- Here is an active capture of the base file.

-
Hold the Ctrl key (Mac:Command key) and multi-select Layers Btn1-3 and PlaceHolderShape as I have captured below.
See Preview -
With those Layers selected, go ‘Layer/New Layer Based Slices’ to add slices in one swoop as captured below.
 Grey badge represents Auto Slices. Blue badge represents your Layer Based slices – these are the ones we will focus on.
See Preview. -
Next:
A. Expand the ‘Ani1’ elements Layer Set
B. Bring the ‘Window/Animation’ Palette to the foreground
C. Bring the ‘Window/Web Content’ Palette to the foreground
D. In the Web Content Palette select slice ’03’, right click and from the list choose ‘Add Rollover State’
See Preview. -
Next, with that ’03’ Slice ‘Over’ state still active:
A. Go to the layers Palette and toggle OFF the ‘DefaultPlaceHolder’ layer set, as captured in the preview below.
The elements in ‘Ani1’ Layer Set is now visible in the document view and now becomes the ACTIVE state (frame 1) in the Animation Palette.
See Preview. -
Next, with that ’03’ Slice ‘Over’ state still active:
A. Add a new Frame simply by clicking the ‘Duplicates Current Frame’ icon button command
B. Select ‘Shape3 copy’ within ‘Ani1’ set and nudge it to your left (I held the Shift key and clicked the Left Arrow Key 14 times to get it my captured position)
C. Select ‘Shape3’ within ‘Ani1’ set and nudge it to your right (I held the Shift key and clicked the Right Arrow Key 14 times to get it my captured position)
See Preview. -
Next, with that ’03’ Slice ‘Over’ state still active:
A. Add a new Frame simply by clicking the ‘Duplicates Current Frame’ icon button command
B. ‘Shape3’ should still be actyive from the previous step, hold Shift key and click the Right Arrow Key until its off the screen
C. Select ‘Shape3 copy’ again, hold the Shift key and click the Left Arrow Key until that layer also disappears off screen
See Preview. -
Next, with that ’03’ Slice ‘Over’ state still active:
A. Select the First Frame in the Animation Palette
B. Click the ‘Tween’ icon command (highlighted blue in the preview)
C. Set the desired Tween Options
See Preview. -
Next, with that ’03’ Slice ‘Over’ state still active:
A. Select Frame 5 in the Animation Palette
B. Click the ‘Tween’ icon command
C. Set the desired Tween Options
See Preview. -
Next, with that ’03’ Slice ‘Over’ state still active:
A. Select All the Frames
B. Then on any one of the Loop controls change from ‘Forever’ to ‘ONCE’ as captured in the preview.
See Preview. -
Next, with that ’03’ Slice ‘Over’ state still active:
A. Click the pickwip icon of the Over State (highlighted in blue in the preview)…
B. … drag and drop it onto Slice ’04’ in the document view.
See Preview. -
Next, select the Normal state of Slice ’03’ (highlighted in blue in the preview) then go Save Optimized to preview your overall progress.
Note: An animation symbol is now attached to the Over state in the Web Content Palette. (highlighted in red in the preview)
See Preview.
Summary:
Create your base and animated elements in organized sets.
Apply Layer based slices.
Create an Over state to one of the Layer Base Slice.
Create an animation in the Over State.
Drag and drop the Remote RollOver pickwhip icon to a target slice as the container.
Since you have the base zip file, mimic the above routine to Layer Based Slice ’06’ using the elements inside ‘Ani2’ Layer Set for the animation.
