[message type=”info”]SAMPLE PREVIEW AND DOWNLOAD NOW UPDATED FOR THE LATEST VERSION OF EDGE ANIMATE[/message]
Here is a tip to help achieve a quick image swap behavior without burdening the Elements Panel with imported graphics and preserve your Timeline animations with other important transitions.
Preview sample Image Swap (mouseover) example here.
Step 1: Import Artwork & Convert to <img>
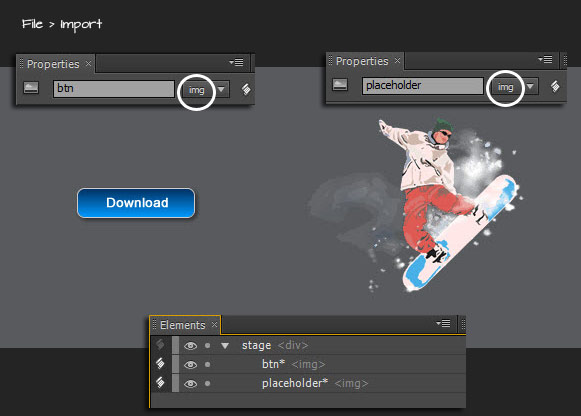
As captured below I have two imported (File > Import) image files on the Stage. On the left a mere button, with the elements name of ‘btn’ and on the right a graphic artwork, with the element name of ‘placeholder’.
Before attending to the mouseover/mouseout behaviors Select an imported graphic file on the Stage, go to the Properties Panel and change the default property ID tag from a div to img, as I have encircled in white.

Step 2: Save Project & Add Swap Versions into the Project /images Folder
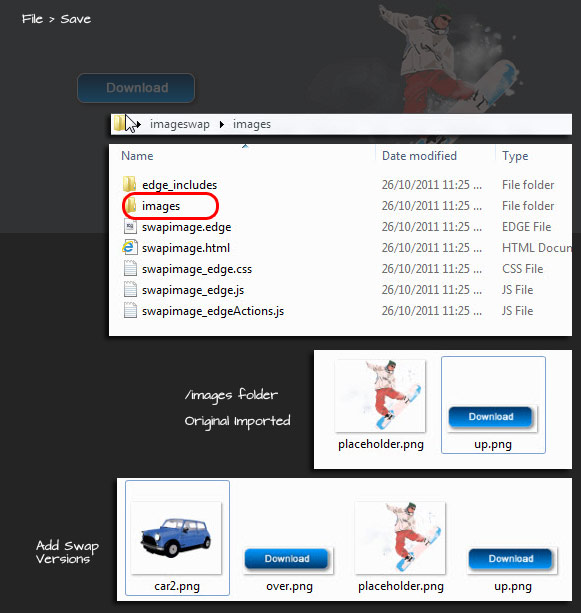
Then go to the File > Save menu command and save your project to a location on your hardrive. Adobe Edge will create the necessary project file (.edge) and associated markup (.html, .css, .js) files, as well as, an /images folder with the associated images carried out by the File > Import process. In my case I imported just two sample images files up.png (btn* element) and placeholder.png (placeholder* element).
To complete the preparation for moseover/mouseout swap behaviors you will need to copy the additional swap artwork into the /images folder. As captured below( bottom) I added a over.png that will swap with up.png (btn* Stage element) and car2.png that will swap with placeholder.png (placeholder* Stage element)

Step 3: Apply Basic Swap Behavior
Now lets apply a basic swap behavior for the btn* <img> Element.
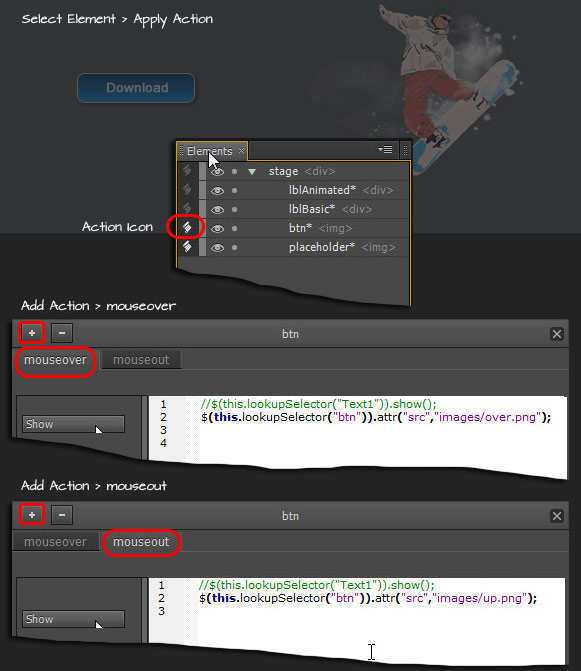
Click the Actions icon command to the right of the btn* element in the Elements Panel. At the Actions Panel dialog click the + icon to Add an Action and from the list choose mouseover. From the preset list click Show so that we can get the basic lookup command for an element and make the relevant changes.
Replace:
$(this.lookupSelector("Text1")).show();
With:
$(this.lookupSelector("btn")).attr("src","images/over.png");
All the above action does is: target the active image element “btn”; then access the the “src” attribute (attr) of the img tag and swap it with over.png that resides in the images folder.
Still in the btn* Actions Panel click the + Add action icon command and from the list choose mouseout. From the preset list click Show so that we can get the basic lookup command for an element and make the relevant again.
Replace:
$(this.lookupSelector("Text1")).show();
With:
$(this.lookupSelector("btn")).attr("src","images/up.png");
All the above action does is: target the active image element “btn”; then access the the “src” attribute (attr) of the img tag and restore it with up.png that resides in the images folder.
Once the two behaviors are in place click the X to the right of the Actions Panel to close it.

Step 4: Save and Preview
To complete go to the File > Save menu command followed by File > Preview in Browser to see the image swap effect.
[divider_top]
For the second swap image effect I applied a little jquery animation:
Mouseover
$(this.lookupSelector("placeholder")).attr("src","images/car2.png").animate({ "left": "-50", "opacity": 1}, 1000);
Mouseout
$(this.lookupSelector("placeholder")).attr("src","images/skier2.png").animate({ "left": "0", "opacity": 1}, 1000 );
Preview sample Image Swap (mouseover) example here.
An example of an image swap routine in Edge Animate.
