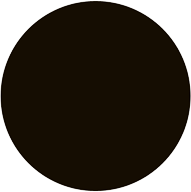
Here’s simple ‘Style’ applied to an Ellipse Shape.
Most effective style’s are created using extreme combinations. Follow along this series, you’ll see just what I mean.
NOTE: To get the actual size of your shape, Ctrl + click on that particular layer in the ‘Layers Palette’ to select it. Then go ‘Window/Info’ and under the ‘Info’ tab check the actual ‘W: & H:’ values to see if they resemble my values. I only stress this point becuase the a big difference in your values at this stage will produce a different result once you apply the different styles. So try to get close!

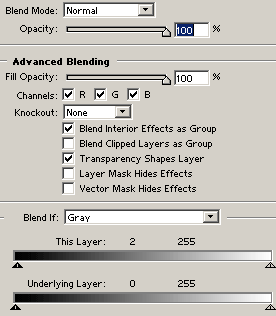
2. Next right-click on the shape layer in the ‘Layers Palette’ and choose ‘Blending Options’ from the context menu options.

3. Set the Master blending style options as I have captured here.
4. Next, set the ‘Inner Glow’ options as I have captured.
Blend Mode color =#76D2F8. Pay attention to my choice of ‘Contour’.
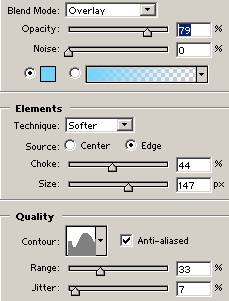
To create the ‘Contour’ curve that I used, click on the Contour thumbnail map  to bring up the ‘Contour Editor’ and recreate what I have captured.
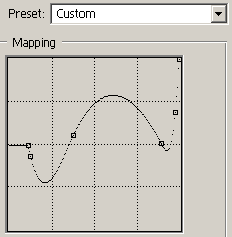
5. Next, set the ‘Bevel & Emboss’ as I have captured.
‘Shadow Mode’ color=#3A73A8.
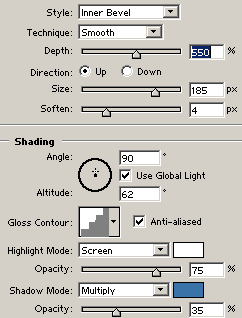
To create the ‘Contour’ curve that I used, click on the Contour thumbnail map  to bring up the ‘Contour Editor’ and recreate what I have captured.
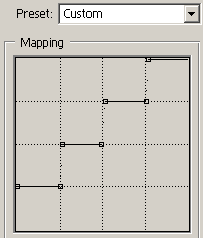
6. Next set the ‘Contour’ style.
Again pay attention to the contour used.

To create the ‘Contour’ curve that I used, click on the Contour thumbnail map  to bring up the ‘Contour Editor’ and recreate what I have captured.
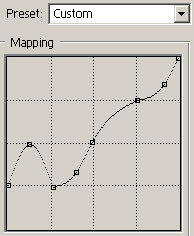
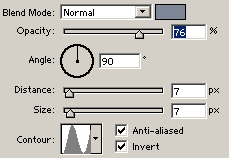
7. Next, set the ‘Satin’ style.
Blend Mode color=#7E8796.
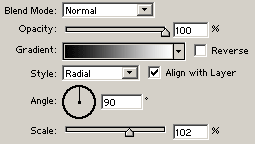
8. Next, set the ‘Gradient’ style.
‘Black to White’, ‘Radial’ style.
And heres the final result.

